Installing 13" Cobra Brakes

I took the car for a drive and went up to 90mph. The acceleration was pretty im pressive, especially so for a stock motor and rear end. As I approached traffic ahead that was going about 45mph, I realized my brakes were weak, in fact, scary. So it's time to bring them up to today's technology.
 pressive, especially so for a stock motor and rear end. As I approached traffic ahead that was going about 45mph, I realized my brakes were weak, in fact, scary. So it's time to bring them up to today's technology.
I decided to install MustangSteve's 13" Cobra brake kit. The kit is pretty straighforwar
 d. It comes with his bracket, the calipers, and rotors. To install his brakes, I removed the brake hub, and had a shop press out the center and then press in the new rotor. Everything else is bolt on. Make sure you install the calipers with the bleed screw on top, you'll never get all the air out - don't ask how I know ;)
 kit is pretty straighforwar
 d. It comes with his bracket, the calipers, and rotors. To install his brakes, I removed the brake hub, and had a shop press out the center and then press in the new rotor. Everything else is bolt on. Make sure you install the calipers with the bleed screw on top, you'll never get all the air out - don't ask how I know ;)
 That was the easy part. Now the hard. My manual master cylinder wasn't going to cut it for the new powerful brakes. I decided to upgrade the master cylinder and add a booster. I purchased the booster new from Autozone for about $60. It is a booster for '90 Mustang 5.0. The Master Cylinder/Reservoir was purchased used on ebay for $ 15. It costs over a hundred new, no kiddin
 g. The master cylinder is for a 2000 V6 mustang. This unusal combination is required due to clearance issuees as well mounting height and cylinder bore size.
 15. It costs over a hundred new, no kiddin
 g. The master cylinder is for a 2000 V6 mustang. This unusal combination is required due to clearance issuees as well mounting height and cylinder bore size.
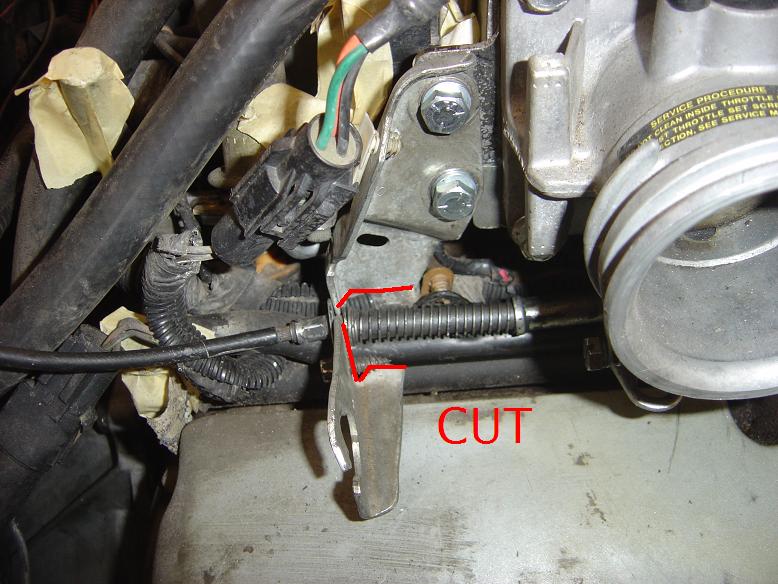
 Mounting the master cylinder requires significant modifications to the brake pedal housing. After removing it, you must cut off its lips and weld on a new plate for the master cylinder attachment. You could buy the plate from MustangSteve or make one yourself, which I did. Then you must modify the firewall somewhat for the Master Cylinder fitment with a template. The Booster needs to be grinded or smoothed out to fit the Master Cylinder as well. Finally, the brake pedal itself needs to modified. The pedal pin must be relocated for the newer master cylinder as its rod mounts a little lower and forward than the stock location. This requires drilling and welding a new one in - once again, comes with the MustangSteve kit.
A proportioning valve/distribution block was also needed. I purchased an all-in-one from summit racing for about $60.
All of the above was straightforward and relatively trouble-free. The hardest time was fabricating brake lines from scratch. I had to build a total of five lines. Two from the master cylinder to the proportioning/distribution block, two from the block to the front brakes, and one from the block to the rear brakes. Getting the length and angle was tough enough, then getting all of them to connect to the block was even harder. To my dismay, I had to redo all the brake lines due to leaks in all of them. It turns out I needed a little more practice on using the inverted flaring tool. Make sure you follow the instructions precisely!
posted by beytzim @ 4:00 PM
0 comments
![]()


